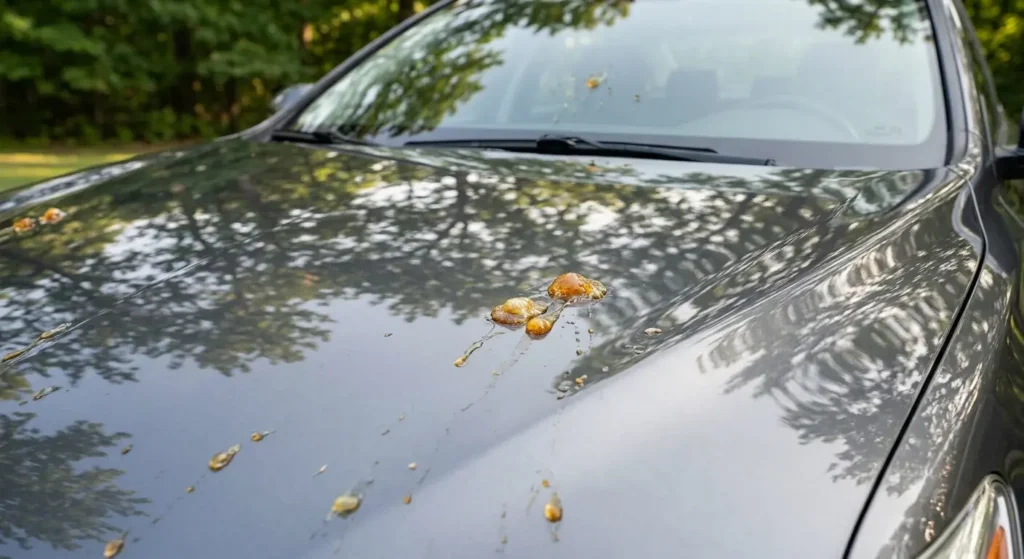
Tree sap gets tougher to remove after it sits in the sun, but muscle isn’t the answer. If you want to remove sap from car paint without scratching it, start by washing away grit, soften the deposit, apply a remover approved for automotive paint, and lift the softened sap with clean microfiber towels. If it won’t budge, repeat the treatment instead of pressing harder. That’s the basic formula for scratch-free paint cleaning.
For a stubborn spot, a labeled tree-sap, bug-and-tar, or automotive adhesive remover is usually the most controlled option. Work on cool paint, follow the product’s dwell time, and never let the chemical dry. Stop and contact a qualified detailer or body shop if the finish looks cloudy, cracked, swollen, or discolored, or if gentle treatment doesn’t loosen the deposit.
Why Sap Fights Back
Tree sap starts as a sticky deposit that can collect pollen, dust, and road grit. Sunlight and hot body panels then bake it into a firmer blob. The longer it stays, the less likely it is to surrender during an ordinary wash.
The grit is often as troublesome as the sap. Rubbing an unwashed deposit can trap abrasive particles beneath your towel. At that point, you’re effectively sanding the clear coat with whatever blew through the parking lot that week. This is why picking at the spot in the driveway is a bad opening move, even if the edge looks temptingly loose.
Sap can also stain or etch clear coat after prolonged contact. Once the actual contamination is gone, you might still see an outline. More solvent won’t necessarily help because the remaining problem may be in the finish rather than on top of it.
What You’ll Need
You don’t need a shelf full of mystery chemicals. You do need clean supplies and more than one towel. Using the same sticky towel for washing, treatment, and drying simply moves dissolved sap around the panel.
- Automotive wash soap and a clean wash mitt
- Warm water
- Several clean microfiber towels
- A paint-compatible tree-sap, bug-and-tar, or adhesive remover
- An applicator pad if the product label calls for one
- Automotive wax, sealant, or an approved spray protectant
- Nitrile gloves if they’re recommended on the cleaner’s label
- Optional fine-grade detailing clay and proper clay lubricant
Separate your towels by job. Use one for softening, one or more for lifting the sap, another for drying, and a clean towel for applying or removing protection. If a towel falls on the ground, it’s retired from paint duty until it’s properly washed.
How to Remove Sap Safely
The safest process relies on dwell time rather than force. A fresh droplet might come off with warm water and automotive soap. A sun-baked lump may require several controlled treatment cycles. Give the cleaner time to work, but don’t assume twice the label’s dwell time will produce twice the result.
Cool the Paint in the Shade
Move the car out of direct sunlight and let the panel cool before applying anything. A hot surface makes water and solvents evaporate quickly. That shortens the useful working time and can leave streaks or dried chemical residue.
The panel should feel cool to the touch. If the car just came off the highway or spent the afternoon baking in an uncovered lot, waiting is smarter than trying to beat the heat with extra product.
Wash the Panel Before Rubbing
Rinse the affected area thoroughly, then wash it with automotive wash soap and a clean mitt. This removes the loose dirt that could scratch the finish once a towel starts moving across it. Rinse again and inspect the sap without picking at it.
A thorough vehicle wash is a sensible first step before any spot treatment. It also makes it easier to see how many deposits you’re dealing with. One obvious blob may have several small companions hiding beneath pollen or dust.
Skip dishwashing detergent as your default car soap. It’s made for dishes, not routine paint care, and it may weaken existing wax protection. Also, don’t aim an extremely close pressure-washer stream at the spot. Pressure won’t reliably dissolve cured resin, and close-range spraying can cause trouble around paint chips, decals, seals, or loose trim.
Soften the Deposit
Fold a clean microfiber towel, soak it with warm water, and place it over the sap. Let it sit briefly while keeping it wet. The goal is to warm and soften the surface of the deposit, not cook it. Don’t use boiling water or a painfully hot towel.
This step may be enough for very fresh sap. If it isn’t, you’ve still reduced the amount of mechanical effort needed later. That’s a win. Scratch-free cleaning tends to be a slow negotiation, not a wrestling match.
Apply a Paint-Safe Remover
Choose a remover whose label specifically permits use on cured automotive paint. Tree-sap remover is the obvious category, but some automotive bug-and-tar or adhesive removers are also labeled for the job. A household solvent with a convincing name isn’t automatically suitable for clear coat.
Read the full label, including restrictions for plastic, rubber, decals, and refinished panels. Spot-test the product in an inconspicuous area. Apply a small amount as directed, keep it confined to the deposit, and allow only the recommended dwell time. Don’t let it dry.
The EPA’s Safer Choice program can help shoppers compare chemicals using human health and environmental criteria. Still, a Safer Choice label doesn’t certify that a cleaner is safe for automotive paint. You must also confirm that the product is intended for clear-coated exterior surfaces. Don’t mix cleaners in hopes of creating a homemade super-solvent.
Blot and Lift the Sap
Use a clean microfiber towel to press or blot the treated spot. Then make a short, controlled pass with light pressure. Rotate the towel to a clean section as soon as sap transfers to the fibers. Once that section becomes sticky, continuing to wipe can smear the resin across the panel.
Try to lift the softened material rather than grind it sideways. Stop if the towel catches or drags. Fast circular scrubbing isn’t a clever shortcut. Repeated pressure in several directions can make any marring easier to see under direct light.
Repeat Instead of Pressing Harder
If the deposit barely moves, apply another mild treatment according to the label. Older sap may need several cycles of softening, spot treatment, and lifting. Heavy pressure, a fingernail, or a hard edge won’t become safer just because the first attempt was disappointing.
Pay attention to progress. If each cycle removes a little material, patience is working. If nothing changes after repeated label-compliant treatment, stop. Escalating to a harsher chemical without checking paint compatibility can turn a removable deposit into a damaged finish.
Wash and Protect the Area
After the sap is gone, wash the treated section with automotive soap. Rinse thoroughly and dry it with a clean microfiber towel. This removes solvent, oily residue, and any remaining traces of softened sap.
Inspect the panel in diffuse daylight and under a direct light source. Feel it gently through a clean plastic bag if you need to check for tiny bonded specks, but don’t keep rubbing a visibly damaged area.
Spot cleaners and repeated washing may reduce wax or sealant. Apply a finish-compatible wax, sealant, or spray protectant after cleaning. Protection can make later contamination easier to handle, but wax can’t repair scratches, etching, or failed clear coat.
Is Isopropyl Alcohol Safe?
Isopropyl alcohol is sometimes used as a controlled spot treatment on fully cured factory paint, but it isn’t universally safe for every vehicle or finish. Concentration, contact time, paint condition, and prior repairs all matter. It can also reduce wax or sealant.
Check the owner’s manual or vehicle manufacturer’s guidance before using it. If the guidance permits this type of treatment, work outdoors or in a well-ventilated area, keep the paint cool, and test a hidden spot. Put a small amount on the towel instead of flooding the panel. Keep contact brief, then wash and rinse the area.
Isopropyl alcohol is flammable. The NIOSH Pocket Guide identifies fire and vapor hazards, so keep it away from flames, sparks, heat, and smoking. Avoid breathing concentrated vapors and unnecessary skin or eye contact.
Don’t use alcohol without specific approval on matte paint, vinyl wraps, paint-protection film, fresh refinishing, or a finish that’s already cracked or peeling. A purpose-made automotive sap remover with clear compatibility instructions is usually easier to use correctly.
Should You Use Detailing Clay?
Detailing clay can help with a faint bonded film or tiny residual specks after the main sap deposit has been softened and removed. It shouldn’t be your first tool for a thick, dry blob. Pushing clay across raised sap can make it grab, and dragging clay is how a helpful detailing product becomes a paint-marring device.
Wash the surface first and use ample clay lubricant. The clay should glide freely. Check it often, fold contaminants into a clean section, and stop if it drags. If you drop the clay, don’t put it back on the paint. It may have collected grit that you can’t see.
Clay can reduce existing wax protection and may leave light marring on softer finishes. Restore protection after use. If you haven’t used detailing clay before, a stubborn sap spot isn’t the best place to teach yourself with extra pressure.
What Should Never Touch the Paint?
Razor blades and metal scrapers don’t belong on painted body panels. A razor may have limited professional uses on certain types of plain exterior glass, but that technique doesn’t transfer to clear coat, mirrors, plastic, tint, or painted edges.
Fingernails aren’t a safe little scraper either. They concentrate pressure in a narrow area and can pull trapped grit across the paint. Hard plastic cards create a similar problem.
Skip dry paper towels, rough pads, scouring powders, abrasive cream cleansers, and melamine foam. Melamine foam is mildly abrasive, regardless of how harmless the white block may look under a kitchen sink. It can dull glossy automotive paint.
Acetone, lacquer thinner, and gasoline are poor choices. They bring paint-compatibility concerns as well as serious fire, vapor, and residue hazards. Gasoline belongs in the fuel system, not on a microfiber towel.
Water-displacing lubricants and vinegar appear frequently in online advice. A lubricant may soften some sticky residue, but it can leave an oily film and may not be approved for every surface. Vinegar’s acidity and limited performance on hardened resin make it an unreliable universal answer. A labeled automotive product gives you clearer instructions and restrictions.
Special Finishes Need Special Care
Matte and satin finishes can develop shiny patches after rubbing, polishing, or waxing. Don’t use generic solvent, detailing clay, polish, or conventional wax unless the vehicle manufacturer approves it for that exact finish. Hardened sap on matte paint is a good reason to call a specialist before experimenting.
Vinyl wraps and paint-protection film have their own topcoats, edges, and adhesive systems. A product that’s acceptable on cured clear coat may stain vinyl, affect printed graphics, or weaken film edges. Check the wrap or film manufacturer’s care instructions before using alcohol, tar remover, or adhesive remover.
Recently repainted panels also require caution. Body shops often provide limits on washing, solvents, waxes, and sealants during the curing period. Factory-paint advice shouldn’t automatically be applied to a panel that left the paint booth last week.
Keep runoff away from porous black trim, rubber seals, and decals unless the remover’s label lists those surfaces. If sap is on glass, treat it as a separate job. Window tint, coatings, mirrors, defroster elements, and nearby painted edges can change which methods are appropriate.
What If the Mark Won’t Disappear?
First, determine if contamination is still present. A raised or sticky spot usually means sap remains. If the area feels smooth but the outline is still visible, the deposit may be gone and the clear coat may be stained or etched. More cleaner won’t polish away altered clear coat.
An indented mark, crack, cloudy patch, swollen area, or peeling edge points to a finish problem rather than ordinary dirt. Stop applying solvents. A qualified detailer can assess light etching and possible polishing, while a body shop is better suited to cracked, lifting, or failed paint.
Professional assessment also makes sense when sap covers a large section, dozens of hardened droplets are present, or the vehicle has a custom finish. Get help if you’ve already used an aggressive solvent or if the cleaned mark catches a fingernail. Machine polishing before all the sap is removed can pull contamination across the panel, so chemical and mechanical correction need to happen in the right order.
How to Reduce Future Sap Trouble
Avoid long-term parking beneath sap-producing trees when you have a practical alternative. If tree parking is unavoidable, inspect the hood, roof, trunk, and upper doors regularly. Fresh droplets are far less stubborn than deposits that have spent several sunny afternoons hardening.
Regular washing helps you find contamination early and removes the dust that becomes embedded in sticky sap. Maintain a suitable wax or sealant as a sacrificial layer. It won’t make the vehicle sap-proof, but it may reduce direct contact with the clear coat and make cleanup easier.
A clean, breathable car cover can help in some parking situations. Don’t put a cover over a dirty car, though. Wind can move the fabric against trapped grit and leave scratches that had nothing to do with the tree.
Frequently Asked Questions
Will Tree Sap Damage Car Paint?
It can stain or etch clear coat, especially after extended contact and repeated heating in the sun. There isn’t one damage deadline that applies to every sap and paint system. Prompt removal reduces exposure and usually makes cleaning easier.
Can a Normal Car Wash Remove Sap?
A thorough wash may remove fresh, light sap and should always come before spot treatment because it clears away abrasive dirt. Hardened deposits often need a separate paint-compatible remover. An ordinary wash can’t be expected to remove every cured spot.
Can WD-40 Remove Tree Sap?
Some owners use water-displacing lubricants on sticky residue, but these products can leave an oily film and aren’t the best universal choice. A tree-sap or bug-and-tar remover labeled for cured automotive paint offers clearer application and cleanup instructions.
Can Vinegar Remove Tree Sap?
Vinegar isn’t the preferred choice for hardened resin. Household concentrations vary, its acidity may be unsuitable for some surrounding materials, and it often isn’t especially effective on cured sap. Use an automotive-labeled remover instead.
Can Tree Sap Be Scraped Off?
Don’t scrape painted panels with a razor, metal blade, fingernail, or hard plastic edge. Those tools concentrate pressure and may drag grit through the clear coat. Soften the sap and lift it with clean microfiber.
Why Is There Still a Spot?
If the surface feels smooth after cleaning but a ring or shadow remains, the sap may have stained or etched the clear coat. Repeating solvent treatment may accomplish nothing. A detailer can determine if careful polishing is appropriate.
Does Wax Stop Sap From Sticking?
Wax or sealant adds a sacrificial layer and may make sap easier to remove. It doesn’t prevent all adhesion or guarantee that the clear coat won’t be affected. Inspect the paint often and remove new droplets promptly using cool-water washing, paint-safe treatment, and clean microfiber towels.